Blog

The official photo blog of J. David Buerk Photography.

The New York City Empty Sky Memorial

All photos from this post, and more, can be viewed fullscreen here.

View photos of my 2015 visit to The National September 11th Memorial & Museum here.

September, 2000

In September, 2000 my family had gone on a trip making its way North along the Eastern seaboard.  One of the stops was in Liberty, New Jersey to see The Statue of Liberty and Ellis Island - we never went into Manhattan proper much to my disappointment.

This was WAY before I knew anything about photography - I just liked taking pictures on my little Kodak Advantix.

This is a picture I shot at age 12 in the year 2000 from the Northern side of Liberty State Park, Jersey City, New Jersey - now the current site of the Empty Sky Memorial.  I remember my parents bickering over whether "those two tall buildings are the Twin Towers or the World Trade Center."  I said I thought they were both; the same thing.  Fast forward a year, and everyone in the World knew the answer without a doubt.

It's incredible to me that I even have this picture, that I shot it myself.  I was 12.  The majority of my life has been post-9/11, working at IAD and DCA.  My entire aviation related career arc has directly resulted from that day in 2001.  This photo is a relic of a time before that; before the TSA and DHS existed, before all the post-9/11 security and societal changes that resulted.

Here is that photo I unwittingly took at age 12.

20180811 Empty Sky NYC 1.jpg

September, 2018

This August I travelled to Rhode Island to visit my friend Alyssa on her birthday, however due to a need for flexible scheduling, I made the journey by car rather than flying this time. It occurred to me by doing this I could make a quick stop at Liberty State Park in Liberty, New Jersey and see the Empty Sky memorial, which I’d only learned of its existence about a year prior thanks to my friend Natalie (who happens to live just 5mi away in Weehawken - I got to visit her on my stop as well :-D). I knew it was the same spot I’d taken that photo as a 12 year old, but it wasn’t until the night before leaving I realized I could try and replicate that photo and compare the New York City skyline across 18 years of history. Before going to bed, I printed a scale copy of my 18 year old photo of the New York skyline (the original print would stay safely at home).

Remarkably, the weather was visually similar to that day in 2000. Textured overcast, but no fog obscuring skyscrapers’ upper floors. Inspecting the original picture, I counted 12 light poles visible, which would give me a good starting point to get me close to the same spot for that matching perspective. To my surprise, the park benches and even the trash cans hadn’t changed in all this time. In order to fit all 12 light posts in-frame, I walked back parallel to 13th light post from the end, and incredibly the perspective aligned almost perfectly - even the park benches lined up, though some trash cans moved, as you’d expect they would over the course of 18 years.

20180811 Empty Sky NYC 2.jpg

I’d come here with a purpose, and to my surprise it took me longer to walk to this spot from my car than it did to fight the wind in correctly lining up my photograph in the shot. Next, I wanted to capture a modern view of the same angle. Taking these photos even required me a lower my camera a little bit to account for my shorter 12 year old stature.

20180811 Empty Sky NYC 3.jpg

And here are the photos, 2000 and 2018, side-by-side. History in both pictures; the Twin Towers visible in 2000, and One World Trade Center erected adjacent to the empty sky where they once stood. Many other buildings have also sprung up across the skyline, and the freshly planted trees in my original picture are all grown up today.

Continue reading for more views of the New York City skyline later in this post.

Empty Sky

Next stop was the Empty Sky memorial, just steps away, visible in the righthand side of the photos above. Empty Sky was dedicated on September 10, 2011, the day before 9/11’s 10th anniversary. Designed by Jessica Jamroz and Frederic Schwartz, Empty Sky is comprised of twin 30ft tall walls spanning 208ft 10in engraved with the names of all 746 victims of the September 11th attacks; on one side, I beams from the Twin Towers stand solemnly - on the other, directly across the Hudson, lies Ground Zero, and the empty sky in the New York skyline where the Twin Towers had stood. The memorial is impressive at all times of day.
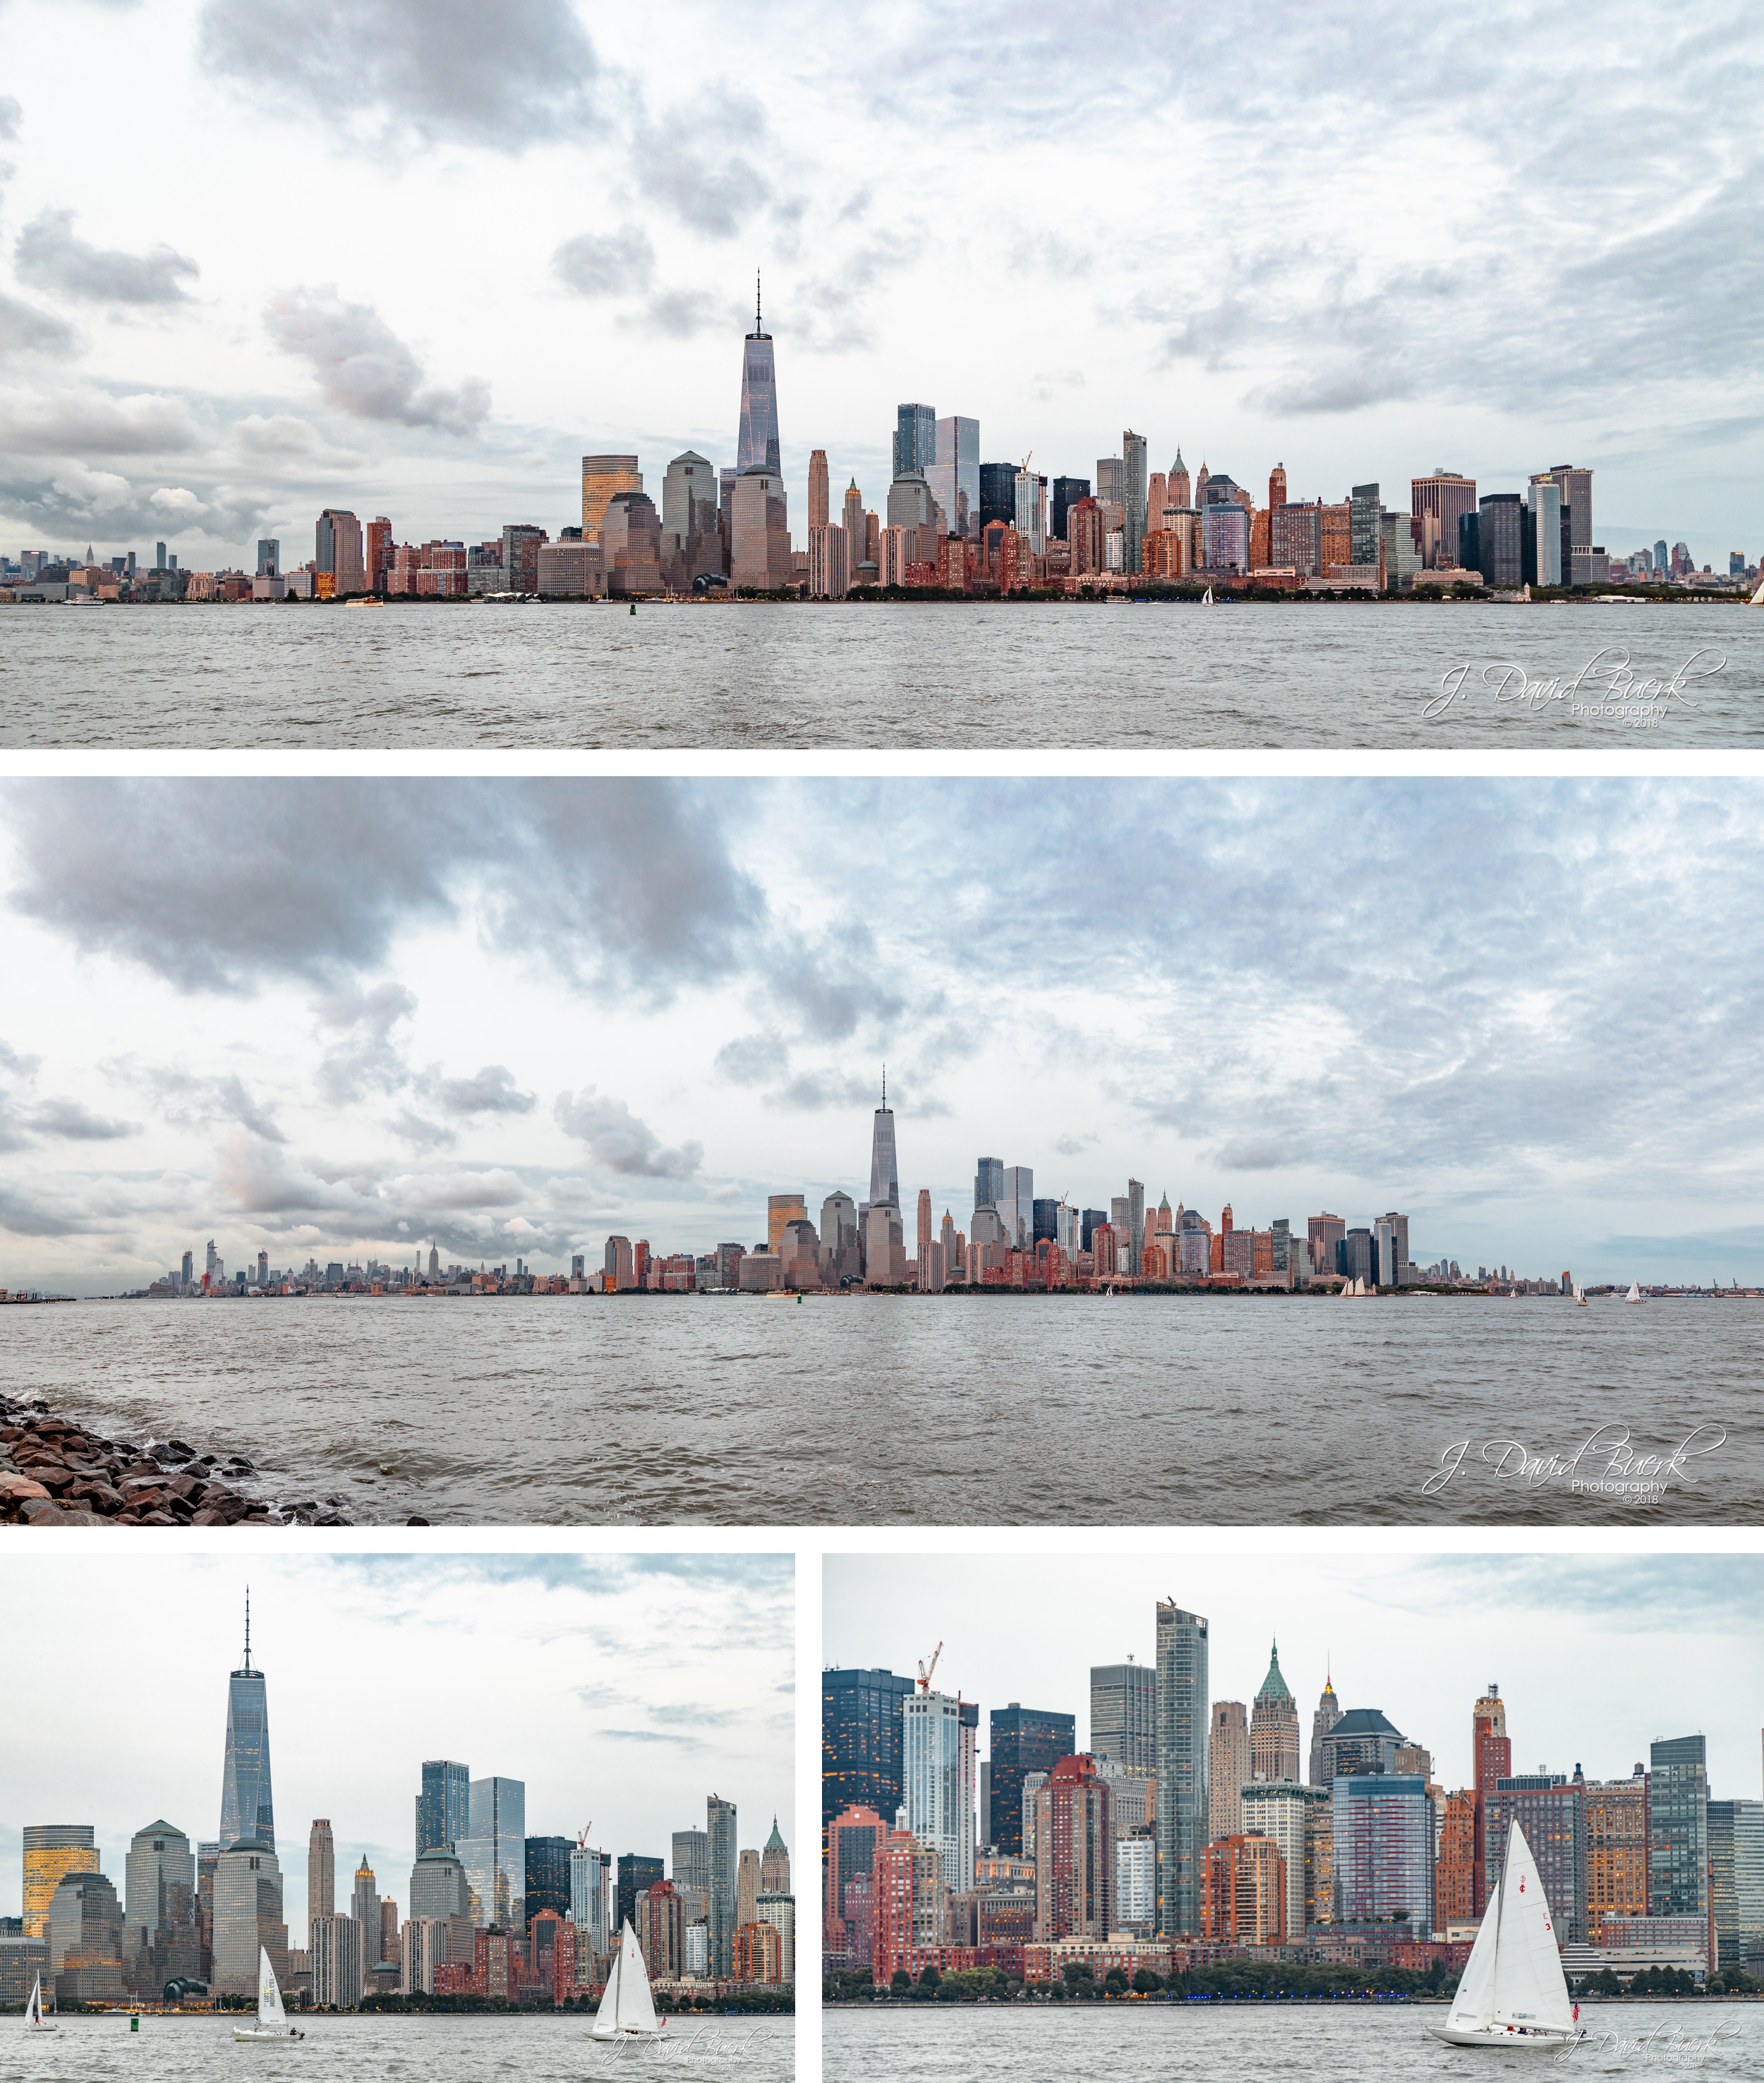
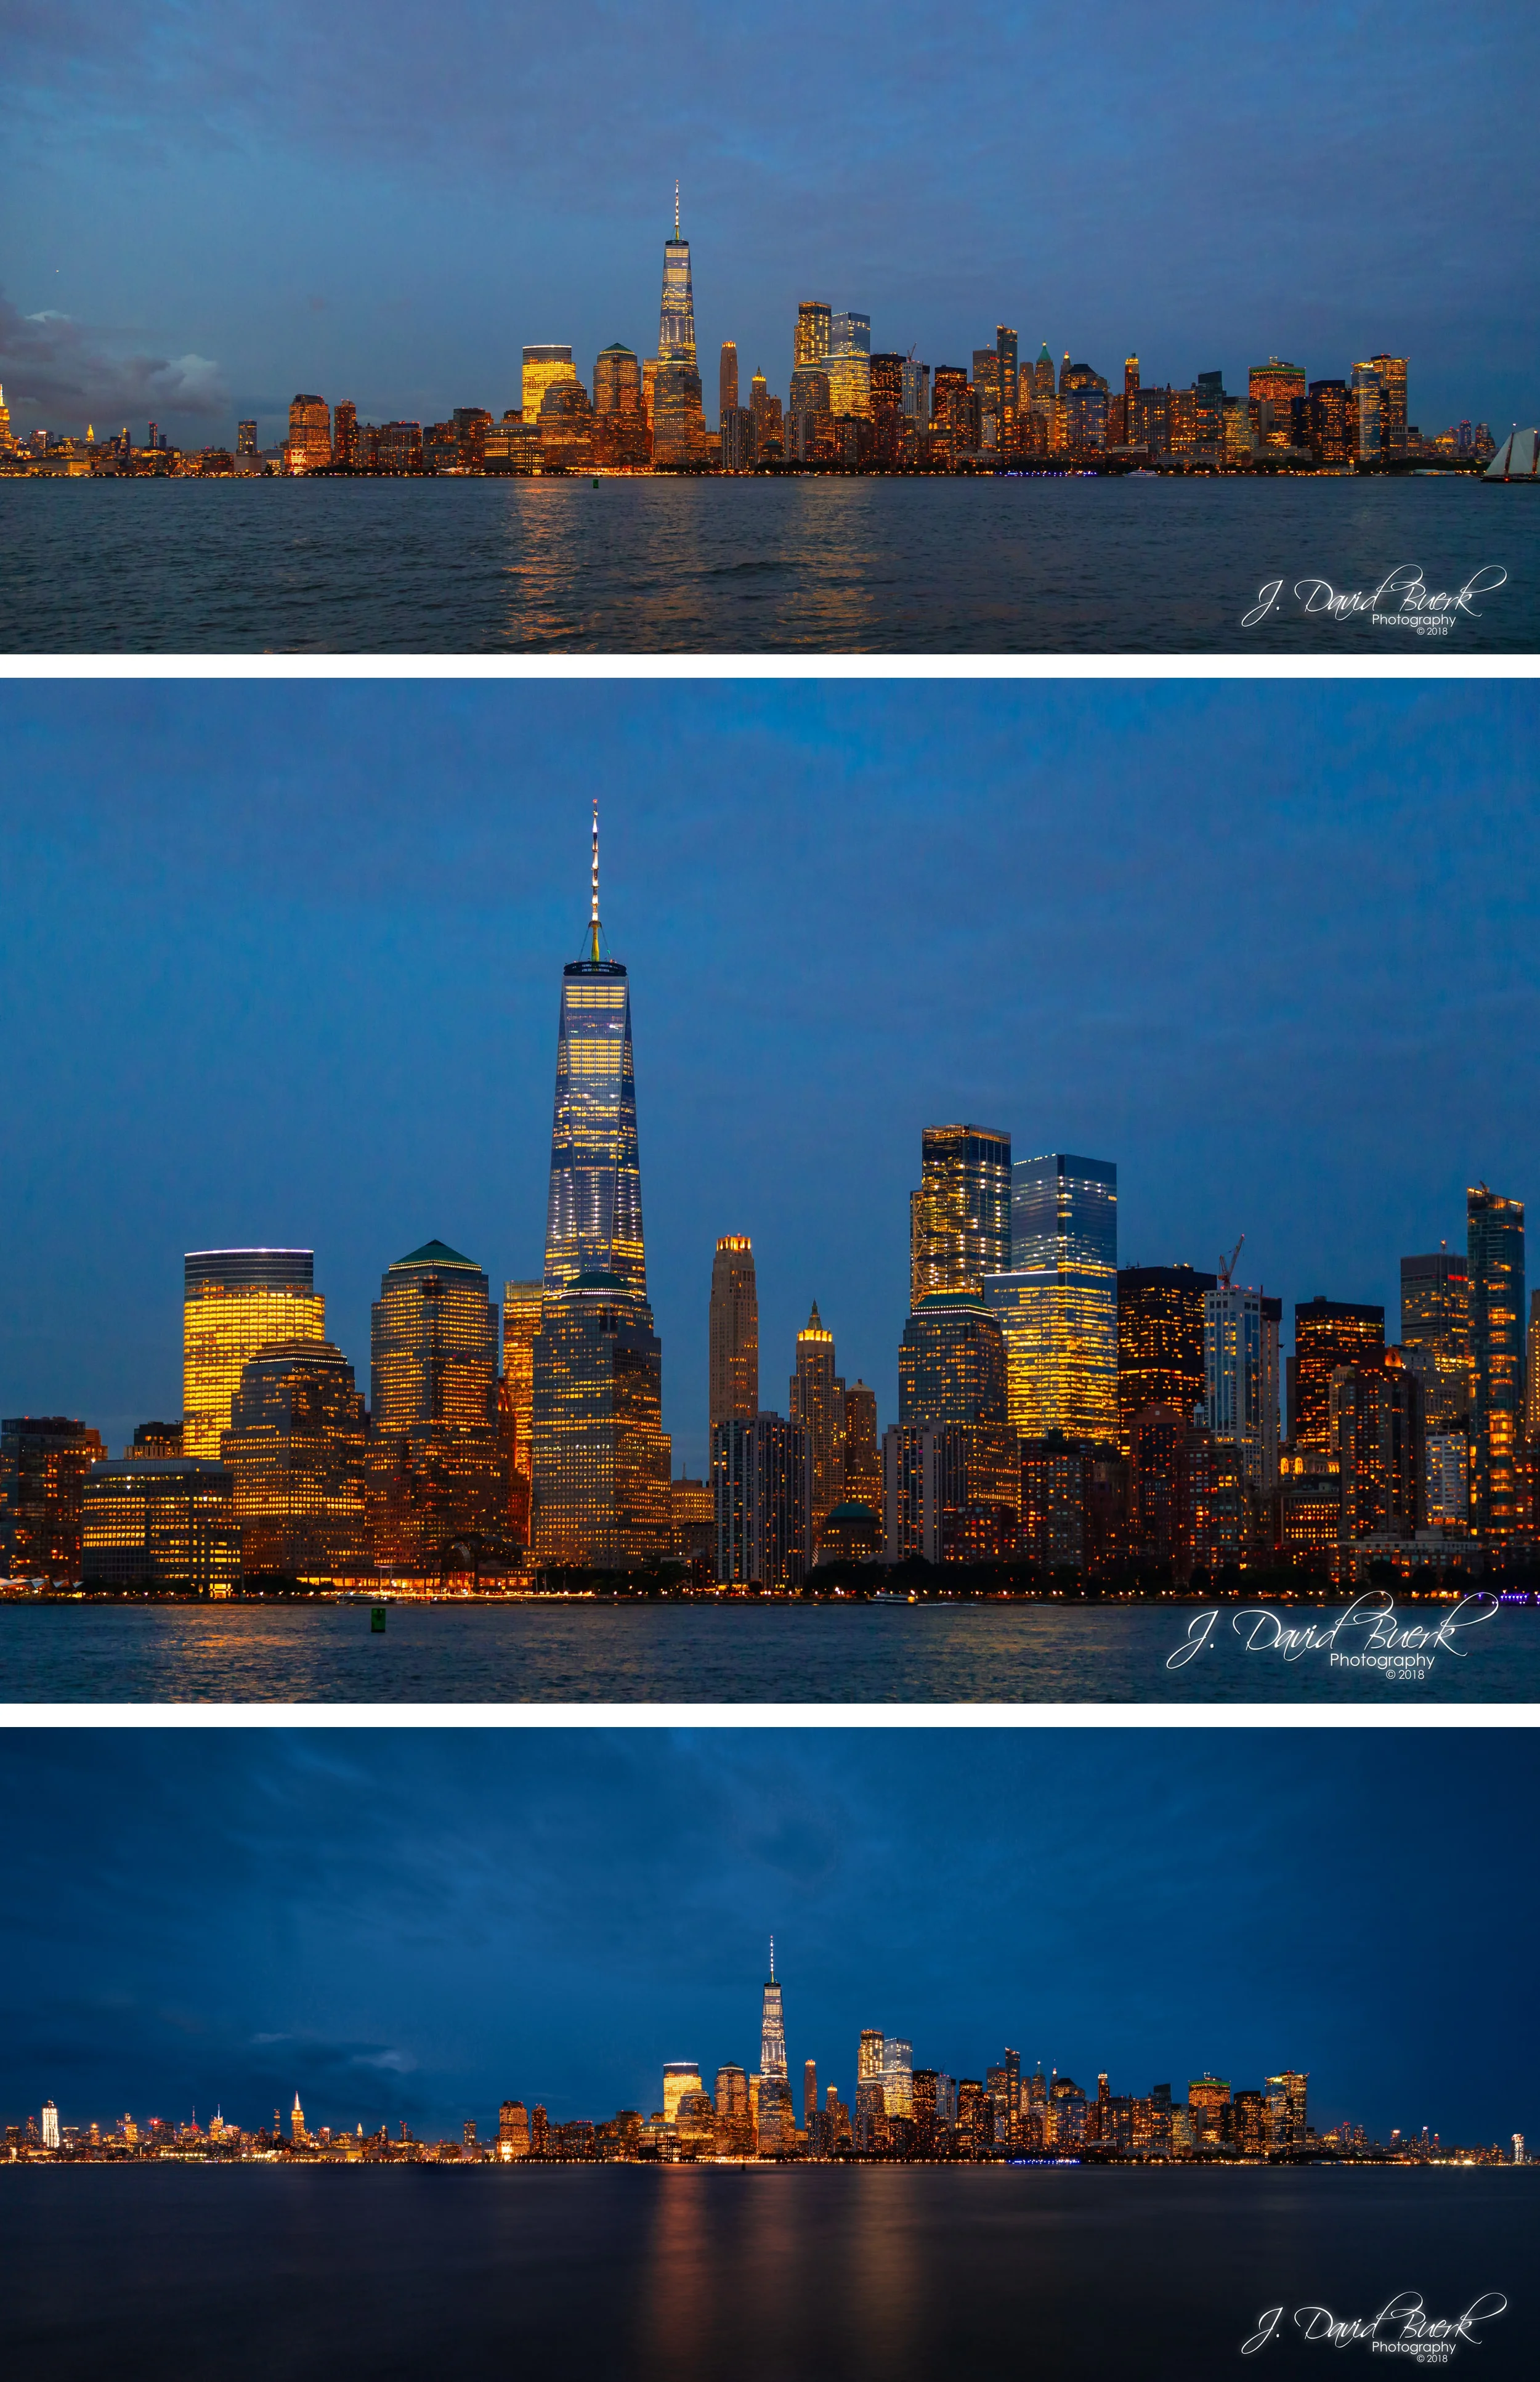
20180811 Empty Sky NYC 4.jpg
20180811 Empty Sky NYC 5.jpg
20180811 Empty Sky NYC 6.jpg

New York City

New York’s sky today is still beautiful, just different. New buildings have sprung up, and One World Trade Center now watches over the city, with the Empire State Building, Chrysler Building, and 432 Park Avenue all overlooking the city uptown. The last five times I’ve been to this city, I’ve been in the city, so this was also happened to be my first opportunity to photograph New York’s cityscape since I was here at age 12.

20180811 Empty Sky NYC 7.jpg
20180811 Empty Sky NYC 8.jpg
20180811 Empty Sky NYC 9.jpg
20180811 Empty Sky NYC 10.jpg

Houston, Texas: July, 2016

Lately I've been catching up on some personal work leftover from last Summer.  Today I'm bringing you pictures from my short trip to Houston to be a part of Imran and Hina's wedding.  Since I was there for several days, of course, the wedding was only a portion of everything I did while on my first trip to Texas.

Arrival

This was only my second time flying out of DCA even though I am there often enough for photoshoots.  It was a pretty day, although it had a low, hazy ceiling, so I captured some pretty pictures of the airport while taxiing, but began battling haze with a little altitude.  I did still manage to catch some great shots of the new MGM Casino (it was still under construction at this point) , and National Harbor... and the DC Water and Sewer Authority; water treatment plants look pretty cool from the air too.

Arriving in Houston, the terrain is noticeably very flat, with long stretches of interstates and service roads, cookie-cutter neighborhoods, and snaking rivers.

George Bush Intercontinental Airport (IAH) reminded me a lot of Dulles, however their facilities seem to be more spread out and reliant on shuttle busses.

Reaching downtown Houston was a shocker; not only was downtown very small at only a few blocks of city space, but on a Saturday, at noon, there were *literally* no people to be found.  There was no traffic downtown; never once did I have to stop and wait for traffic when crossing streets.  There were no people walking around.  Half of the businesses weren't even open.  I was the only customer in a coffee shop which, inexplicably, had three employees working.  There was an international grocery store with an amazing wine selection upstairs that had a few customers inside, but that was about it - Houston, at lunchtime on a Saturday... completely dead and devoid of life.

Arriving at the hotel at William P. Hobby Airport (HOU), I found that directly next door was an... establishment... called "The Landing Strip."  I just found it ironic that Imran's wedding was being held at an airport Marriott with a titty bar a stones throw away.  It actually became a running joke of the trip, culminating in me sitting down in Imran's lap before his wedding, straight out of the shower, wrapping my legs around him and sensually saying, "Hey baby, is this your first time at The Landing Strip?" just to get a reaction out of him; it was pretty funny!  You can't make this stuff up!  That actually happened the next day, while everyone was getting ready for the wedding, but I shot these pictures as the sun set on my first night in Houston.

Johnson Space Center • Imran and Hina's Wedding

Imran's wedding was at night, so that left all day to go explore.  I'd already seen downtown, which was disappointing, to put it politely.  I decided to see something guaranteed to make me smile; I head over to Johnson Space Center, just 20min from the hotel.

Mythbusters: The Explosive Exhibition

Little did I know until walking inside, the Mythbusters (who had just a few months prior aired their last episode) had a full exhibit visiting the Space Center.  Not only did I get to meet the real Buster, but I got to see artifacts from all my favorite myths; Jamie's steel sphere from "Painting with Explosives," Adam's Flatus Ignition Seat from "Franklin's Kite," Adam's Tornado Shield from "Storm Chasing Myths," and a destroyed hot water heater from "Exploding Water Heater."

By the way, if you haven't seen it already, go check out White Rabbit Project on Netflix; that's where Kari, Grant, and Tori ended up after being cut from Mythbusters.  It's a very Mythbusters influenced show, but with a modernized program format that fixes a lot of the staleness Mytbusters struggled with toward the end, and the extremely high production quality we've become familiar with from Netflix.  I cannot recommend the show enough.

Johnson Space Center

The rest of Johnson Space Center (or Space Center Houston, as the museum portion is called) contains all the space geekery you expect; I love it.  Most of the exhibits here focus on historic space missions, such as the Gemini and Apollo programs.

Shuttle Carrier Aircraft

Outside the Space Center is of course one of Johnson's most noticeable, newest additions, and the most relevant to me; NASA's Shuttle Carrier Aircraft I photographed and followed for a week in April, 2012, which led to some amazing opportunities for me, and which I consider to be the launchpad for much of my career today.

It was a surreal experience boarding the retired 747 for the second time in my life, knowing that everyone else seeing the aircraft with me that day are enjoying a museum piece, but I was on board while the aircraft was still in service and even met the flight and ground crews, and they autographed copies of my photos on a table that's now blocked off as part of an exhibit.  Knowing that I've been on the upper deck and sat in the pilot's seat of this aircraft, whereas now it's not even open to the public to view... it was a surreal feeling, and it's still truly an honor to have been invited to be part of such a journey in 2012.

For fun below, I'm including some side-by-side comparisons of what the SCA looked like in 2012, and what it looks like now after its decommission and subsequent transformation into an exhibit.  You'll notice that in addition to some hardware being moved and a lot of plexiglass being added, they've also had to add fireproofing and sprinklers for fire code, and they've added carpeting, HVAC, standard glass entry doors, and of course lighting.  Crew-members and mission critical employees have also signed all over the fuselage, as is tradition.

Since it's closed to the public, here is what the upper deck looked like in 2012.

And finally, a few more photos of the SCA in it's final resting place as it is today.  This table is where the crew autographed my photos.

Astronaut Training Facility

Later in the day, after some inclement weather had passed through the area, campus tours finally resumed, however unfortunately there was only time for one tour before having to leave, and I didn't get to go on the tour of Mission Control like I'd wanted.  Seeing the Astronaut Training Facility was still interesting, and I was able to snag some awesome swag at the gift shop before heading out.  I still don't have my SCA 747 & Space Shuttle Discovery scale model though :-(

Imran and Hina's Wedding

Finally was the main event; Imran and Hina's wedding.  I was just a guest, which is an odd feeling for me since usually I'm behind the camera.  I didn't even bring my camera to the wedding; these are a few photos off my iPhone.

Departure

The next morning immediate family (which I'm considered in Imran's family) was invited for brunch.  After that, there were still a few hours to kill before catching the flight home.  Checking out the Texas' Gulf beach and getting some photos of the EcoBoost Mustang rental seemed like the best thing to do.

Mustang on the Beach

I was extremely disappointed with the beach in Texas; it seemed *very* dirty.  The Mustang, however, was very satisfying.  The EcoBoost Mustang, even with two fewer cylinders, makes only 20HP less than my G37, though since it uses a turbo to achieve this, the power came on with a delay.  Still a very peppy, very capable car.  Would I buy one?  No; this rental had less than 3,000 miles on the clock and already had multiple rattles, probably since day one from the factory.  But it was still a fun, very hoonable ride; I may have gotten a few donuts in this thing... which is convenient, because Houston seemed to be a never-ending sprawl of donut shops, fast-food joints, rug stores, and titty bars; between all that and the beach, it was time to skip town.

Departure

Flying home, I got a little work done, but eventually got distracted by the band of thunderstorms we were passing over about halfway home; this was my first time seeing lightning from the sky, and it is a beautiful sight.

With a steady hand, and a bit of luck, I was able to capture this photo of the storm over Charlotte, North Carolina.  I even managed to get some video footage too!

Finally, we landed at DCA (also only my second time flying into Reagan), and the lights of Alexandria was a welcome sight just before touchdown.

Film Haul: Old Film, New Scans

So I have a confession to make: I'm a really bad film shooter.  Specifically, I'm horrible at getting film processed in a reasonable timeframe, since I stopped developing my own film after completing darkroom classes in 2009.  I miss film. I miss the darkroom.  I miss film canisters, test strips, and silver grain.  Maybe those days are over.

I've shot film for fun ever since learning how to develop and print; not often, but often enough.  I've always enjoyed the variance of color shifts by film, but haven't had access to a darkroom in years, so I've had to pay for processing.  This is in addition to having an all-digital workflow for paid shoots.  Knowing that big-box and drugstores don't bother to regularly calibrate their machines, often using expired chemicals to stretch their overhead, and set scanners to AUTO, for several years I let Penn Camera handle my film processing expecting quality and consistency.  I'm not sure if Penn was guilty of the same injustice many consumer labs are guilty of, but the scan quality always lacked (I don't order physical prints).  Given my dissatisfaction with Penn, I tried Dwayne's Photo (recently famous for being the last film lab in the World to process now-discontinued Kodachrome).  They were an improvement, but colors still never seemed quite right, and contrast was still so high that shadows were still sometimes blown out.  I think this was a problem with the scans more than the processing - in looking at my negatives from Dwayne's, I expect I could have them rescanned more carefully with much better results.

Something has always been missing... until now.

I've been searching for a highly reputable film lab for years now - not terribly hard, but I've been looking and reading other photographers' experiences.

Every person I found who had tried Richard Photo Lab was in LOVE with them... and now I'm writing my praises too!  Their pricing is almost double what other labs charge, but there is a reason; the quality is unparalleled.  After a bit of comparison, I chose to have my film scanned on their Fujifilm Frontier scanner, as I consistently found its color and tonality reproduction to be smoother.  And with two fresh rolls out of my new (old) medium format camera, I had more than enough reason to send in the rolls of film I've let pile up waiting to ship to RPL (this is why I'm a bad film shooter).

Ilford Delta 400 (35mm)

Let's start with the oldest - I had a roll of Ilford Delta 400 I think Gwyn gave me back in film class in 2009 - I got around to shooting it in 2014's big March snowstorm (I usually don't shoot B&W films).  Hiking along the Potomac, Jake and I kinda came across this trail by accident and decided to see where it led after reading the trailhead map.  I'm not even sure what trail this was.

I apparently killed off the roll shooting these two photos at Dulles while waiting for the sun to set so I could photograph the Main Terminal lit up in pink for breast cancer awareness.

I should note that while I chose Fujifilm's Frontier scanner because of my preference of its color reproduction, black and white films are only scanned on the Noritsu.  This isn't a bad thing; RPL's Noritsu scans are slightly higher resolution, and there is less demand, so turnaround time is faster (unless you are like me and your order encompassed both scanners).

Overall, my order of 3 Frontier rolls and 1 Noritsu roll took 12 days from arrival to scan delivery (I sound like I'm ordering sushi - seriously, you sushi places need to start making "Fuji Rolls" that look like film canisters - I'll love you forever and ever).

Kodak Portra 400 (35mm)

Same day, same story, different film.  Portra 400 is my go-to film.  I like its smooth, creamy highlights, and subtle green hues in the shadows.  This roll was sitting in my camera for several months; an incomplete roll that I started in the Fall, and finished in the snow.  Let's start with those snow pictures.

I often push Portra 400 +1 or +2 stops, but I have a hunch I had this roll set up to experiment with pulling the film a stop or two, and didn't realize it when I sent the roll in.  The scans from this roll were incredibly color grainy, with loss of shadow detail, so I can only assume this was the scanner compensating for overexposed / underdeveloped negatives... poor negatives which I'm sure were my fault.  I think the roll was to be pulled, but it sat on my desk for a year waiting to be sent in with no notes written on it - I think I was supposed to give development instructions to pull this roll, but didn't know when I sent it in.  I'll know for sure when I have the physical negatives back to check out.

Either way, here are those photos.

In the case of this Portra 400 roll, I applied a lot of color noise removal - I have not applied ANY luminance noise removal to ANY of the film photos in this entire post.  Given the amount of noise in this set of scans, the color noise now appears as luminance grain.

I must also note that I have not applied any color edits to any of the film scans on any section of this post. The only edits I have applied are basic contrast adjustments to bring tonalities to absolute white and absolute black (as you would in a darkroom).  The thing that makes RPL's scans so great (when you haven't left out key development instructions like I did on this roll... oops!) is not a thing... it's a WHO!  Every single roll of scanned film is done by hand, individually, by a person.  There are no presets.  There are is no "automatic" setting.  You get a real, live, film professional with years of experience who inspects your images and scans, and changes the scan settings to bring out the best of your film, as well as match any stylistic preferences you have given.

Richard Photo Lab offers what are known as Color PACs, or Personal Account Consultations, which allows their customers to help put a color profile together for film technicians to match stylistically.  The interesting part about a Color PAC is that it isn't a saved color profile with settings plugged into the scanner; it is a tangible set of notes and photographic examples for techs to review and make individual decisions in order to match new rolls to a given Color PAC.  If you don't have a Color PAC with RPL, you can opt to use another photographer's which is existing on file.

For more information on Color PACs and how Richard Photo Lab processes behind the scenes, Johnny Patience has a great article on his blog after he interviewed Richard and his crew.  I did not use a Color PAC for my photos, particularly since this is my first time trying Richard Photo Lab out.  I wanted to see what the lab is capable of without any influence - I'm blown away, particularly by the 120 Portra 400 later in this post.

Here is a snap of the Darling Starling I shot during the same storm.  You'll notice that I posted my digital photos of the Starling and this hike along the Potomac in this earlier blog post.  This photo required a large amount of adjustment for the whites and blacks, as it was the flattest photo I got back, with almost no shadow detail.  A fair recovery, nonetheless.

And here is the reason I think I had this 400 ISO roll was set for 200 or even 100 ISO: the very first shot on the roll was shot in broad daylight, using my 90mm tilt-shift lens wide open.  I like to shoot primes as wide open as applicable, even in daylight, so I probably chose to drop my effective ISO to shoot wide open in daylight... then forgot I'd done it.

Still pretty though.

Mamiya Super 23 Press Camera

I suppose now I should introduce my newest camera acquisition.

A few years ago, when I wrote my Lubitel 2 to EOS conversion post, I gave my high school geometry teacher a shoutout for the math skills I learned in his class which helped with that project.  He followed my photography before that, but since then he's followed me even closer.  Recently he and I met up to reunite and catch up from the last decade (iPhone 5 selfie).

At the same time, he told me about his Father who had passed away.  His Dad had a good collection of high end photo equipment, and rather than see it collect dust, his family wanted to see it given to a good home where it would surely get some love.

So that's how I came to have my first professional (albeit 47 years old) medium format camera.  I still have my Holga, which is also medium format... but it truly is a toy in comparison.  Toys are fun though!

Here it is; a very used but very good condition Mamiya Super 23 Press camera, with Mamiya-Sekor 100mm f/2.8 Seikosha-S and Mamiya-Sekor 250mm f/5 Seikosha-S lenses (apparently the two rarest, most desirable lenses for this short-lived camera system thanks to their Seiko produced leaf shutters), 6x9 and 6x7 film backs, ground glass view back, and a few other small accessories.  Here's a digital photo of the film camera.

And here I am shooting it for the first time (thanks to David Tsui for the photo; another digital photo).

You'll notice that it's a very odd rangefinder.  The shutter button is a left-hand trigger on a detachable pistol grip.  As with many medium format cameras, film is exposed via a leaf shutter built into the lens.  The shutter may be triggered on the lens itself, or the pistol grip's remote wire can be screwed into the lens to activate the trigger.  Film backs and ground glass backs may be hot-swapped by pulling or reinstalling the dark slide.  There are two coldshoes, and flash sync is built into the lens with two modes for different types of flashes (not front vs rear curtain as often confused).  Tilt and shift adjustments are built into the camera body; the film back is actually on a bellows with four lockable posts.  Macro rings were sold as an accessory, but you can cheat a little and fully extend the bellows to get a shorter minimum focal distance without macro rings (and without rangefinding - you'll have to focus using ground glass to do this).  There is no meter; you must use an external meter - I used a free app on my iPhone, amazingly with spot-on accuracy!

Framing is achieved by composition aids in the viewfinder, illuminated by sunlight shone in a diffuser panel and directed through a set of mirrors.  A switch offers composition lines for 100mm, 150mm, and 250mm, although a 60mm wide-angle lens is also available.  Rangefinding focus is found in a small, double image circle in the viewfinder center.

Before I shot with the camera, I gave every component a good cleaning, removing the years of dirt and grime that had collected from living in a box.  Using the ground glass back and a film loupe (yup, they are for more than checking out negatives!), I calibrated the rangefinder for both the 100mm and 250mm lenses I have - luckily the problem was a rangefinding misalignment in the camera body, meaning I only had to fix it on the body for all lenses to calibrate, rather than adjust the rangefinder bar individually on each lens.  If I hadn't done this calibration, every photo below would have been out of focus (but would have registered in focus in the viewfinder).

While calibrating the rangefinder, I also noticed that the lenses are somewhat unusual in that they do not allow focus past infinity - this is most common on pre-autofocus lenses, but makes me uncomfortable in the event that a lens comes out of calibration, and no longer has that extra leeway to focus at infinity even if the dial says you're past it.  The advantage to this is that you don't have to worry about going past infinity if your lenses are properly calibrated, as these thankfully are (you just twist the dial until it stops at infinity, and don't even have to pay attention to focus in the viewfinder... assuming you want focus at infinity).

The Mamiya Press mount line of cameras only lasted 11 years, being discontinued in 1971, left in the dust by the 645 system introduced in 1975, which is still one of the most popular medium format systems in production to this very day.

An interesting camera to say the least.

Kodak Portra 400 (120)

This is what Portra SHOULD look like!  Never before have I had my film come back so crisp and vibrant.  Beautiful tones, outstanding range, and very little grain!  Thank you Richard Photo Lab!

I shot my first two rolls on the Mamiya Super 23 with Portra 400 at box speed, with beautiful results!  Unfortunately I missed Autumn's color peak in the Shenandoah Valley this year due to my travel to St. Louis, but I still went with friends on a frigid weekend; there was snow on the mountaintops.  With the way the wind blows and sun shines, one side of the mountain valley still had color, and the other was barren; all the leaves had been removed by Mother Nature.

120 roll film in a 6x9 format only gets you 8 exposures per roll.  I shot two rolls of Portra 400 atop the mountain; my last two frames as the sun had just dipped below the horizon.

As soon as I finished these two test rolls (shot a few days after calibration regardless of subject matter to ensure my calibration was accurate in actual practice), I sent them to Hollywood to get them in RPL's queue.

I want to shoot a portrait session on this camera!  Specifically lifestyle portraits; maybe even in the snow.  I have a roll of Fuji Pro 400H loaded in my 6x9 back, but haven't gotten to shoot it yet - this will be an experiment regardless, since I've never shot 400H.  I do know from seeing others' photos that it's another film I have found the tones interesting, with its daylight balanced blue-greens.  I'm unsure how it will look for portraits, but that's the fun of it.

Digital: Shenandoah Valley

The rest of the photos in this post are digital, shot on a Canon EOS 1D X.

I think it's only fitting that I show the digital photos shot alongside the medium format film.  The final three were shot by Jake (no watermark), but all were edited by me before I had the film scans back.  If I had waited for the scans to come back first, I could have edited the photos to match the scans.

Overall I seem to edit slightly more vibrant than film, but tend to have similar tonality.  I also tend to stretch the dynamic range a bit.  This isn't really news; I like to try and mix the tonality of film with the added benefits of digital when I process my digital photos.

I couldn't be happier with finding Richard Photo Lab and the results they have gotten me with the new Mamiya.  I've already started a roll of Fuji Pro 400H, and can't wait to finish it and a few others before sending them in for the next film haul.

One last thing; I have to leave you anticipating SOMETHING.  So you know my converted Lubitel lens on Canon EOS?  Literally the same day as receiving my digital scans from RPL, I was given a lead on something that will... give my digital photos even more character... stay tuned folks!...

Skyline Drive and Calvert Cliffs State Park

Shenandoah National Park's Skyline Drive

Last week was the annual trip to Skyline Drive to enjoy the Fall colors and a scenic drive.  The trip is always all about the cars.  This year I was packing two brand new 600EX-RT Speedlites from Canon to try out at dusk for some dramatic car photography.  To date, I've never had the equipment to shoot photos of cars like this, so I've never had a decent picture of my car.  Overall, the shoot went well, with no problems with the 600EX-RTs, with the exception of the Camero not being properly waxed - in the end, I used it as an exercise in Photoshop to clean up the black car.

01

01

Of course we shot the cars while there.

02

02

Once night fell, it was time to pull out my new flashes to test.  The 600EX-RTs were triggered via PocketWizard Flex TT5s.  You may be asking why I am using PocketWizards on flashes with built-in radio triggers - firstly, because I currently only have two 600s, and was using both off-camera and need a way to trigger them.  Next, I like the AC9 ZoneController's ease of adjusting my flash groups better than Canon's Group setting, which also isn't compatible with my 5D Mark II (only compatible with the 5D Mark III or 1D X as of this posting).  The 600s don't support remote 2nd curtain sync or high speed sync stock, nor are they compatible with studio strobes such as Alien Bees; the PocketWizards allow me to use these features and remotely adjust power levels on studio strobes.  And finally, my other flashes are "legacy" now, and do not have built-in radio triggers - I will eventually be selling my old flashes and upgrading to an all 600EX-RT system (and possibly ditching the PocketWizards too... we'll see).  The Speedlite 600EX-RTs work perfectly with the PocketWizard Flex system, with none of the range or power issues that plagued the 580EX and 580EX II.  I have nothing negative to say about the 600EX-RT as of right now, except that the included CTO gel and gel holder are useless and will break easily - leave these at home and use commercial grade gels you can rely on; I prefer the HONL Photo Speed Strap and Color Correction Gels.

All night photos were shot with two bare 600EX-RTs with Full CTO gels.

I'm also sad to announce that this beautiful ride was cosmetically damaged in yesterday's Hurricane Sandy.  The owner suffered worse losses though - the same tree that hit this Cougar totalled 3 of his other vehicles when it fell; the Explorer was smashed in half, and his Jetta and Caravan have caved roofs, severely dented body panels, and shattered windshields and rear windows.  Of the four, only the Cougar is still drivable, and has less than $100 of damage.

You can see his damage photos here.

03

03

While I was shooting my car, a guy asked if he could get pictures with my car.  While I was setting my lights up, he leaned against my driver's door while his friend took photos of him.

04-2

04-2

Finally, Chris' car required the most work.  Wax on, wax OFF!  The car was freshly waxed, but not properly wiped down.  Chris tried to wipe it clean with his sleeve, but to no avail.  I ended up shooting the car anyway, and using it as a practice photo in Photoshop to clean up the car.  This was the first time I've edited a car this way, and I'm sure there were better ways to do it with better results, but not bad for a first time.

05

05

Interestingly enough, both the Camero SS and Cougar V6 are 35th Anniversary Editions.  And then there's that green car which is actually an Eclipse just pretending to be a Chrysler.

Here is the unedited "Before" with a peek at all the folders of layers required to clean this beast up.

06

06

Calvert Cliffs State Park

Last Friday, less than a week later, and just a few days before Hurricane Sandy hit the US East Coast, I decided to escape for a day to Maryland's Eastern Shore.  I chose to go to Calvert Cliffs State Park because while I'd been to the park previously, I wasn't able to see the cliffs; I've wanted to go back ever since then because I've always felt my previous visit was incomplete.

For this trip I also brought along my EF 70-200mm f/2.8L IS II USM and Extender 2X III, both of which had arrived back from Canon Professional Services the day before.  The 70-200 developed a strange "soft-focus" halo effect around in-focus areas; photos shot with the 2X III only amplified the problem.  I originally got the 2X III in preparation for the Space Shuttle events... even with the issue, I'd say I did OK that week :-)  This time I was eager to test out the newly fixed and calibrated lens combo (a misaligned lens element was calibrated, an improperly installed and programmed autofocus lens group was replaced, and both the lens and extender were calibrated with one another).  Because I wanted to run it through its paces, I shot primarily telephoto in the 140mm to 400mm range the entire day.

07

07

I got about 1.75 miles into the hike to the cliffs and came upon a Park Ranger who was looking for somebody from Hood College who'd illegally parked their RV across 6 spots.  I told him that I wasn't from Hood, though I have a friend who went there.  We talked for a bit, and he offered me a ride to the Cliffs in his ATV, just a short distance up the trail; he was heading there next to look for his Hood College driver.  When we got to the cliffs, the beach was deserted, and he told me about the geology of the cliffs and how the sand used to attract people for making Sand Art, the fossils and debris that wash up onto shore, and the history of the surroundings, to include the offshore Natural Gas Plant and Cove Point Lighthouse, all while I shot pictures.

08

08

During this, the Ranger told me about a closed area of the park, several miles away, on the Northwestern edge of the park that is home to a good number of Bald Eagles.  He knew I'd want pictures there, so we got into the ATV, and he began driving me to the spot.  We talked about Blackwater National Wildlife Refuge while riding along, and how I've wanted to go there for several years now to see their Eagle population.  We soon came across a group of students from Hood College's Costal Studies Program; the group was finishing their day of site visits in Calvert County by hiking to the cliffs and learning about the Chesapeake Bay's and the park's ecology.  Interestingly enough, the one professor with the group knew my friend from Hood, and taught several Biology classes she took.  The other professor was wearing a Blackwater National Wildlife Refuge shirt, which both the Ranger and I commented on, since we had just been talking about it.  A few of the students were curious about my camera and why the Ranger was giving me a special photo tour - I spoke with a few of them and they told me about the Coastal Studies Program at Hood.

09

09

Clearly this day was not going anything like how I'd expected.  I'd done practically no hiking, and instead of photographing the beach and the cliffs, I was about to spend several hours spotting Eagles in a remote area of the park.  Certainly not complaining; I love raptors, and always want photos of Eagles.  The day was just going completely differently than I had intended.

10

10

After passing through several miles of abandoned trails (which I learned were originally built as logging roads) and bumpy terrain through the active hunting grounds, the Ranger and I finally came to Grove Creek where the Eagles thrive.

11

11

Immediately, we spotted at least 6 adult and juvenile Bald Eagles; unfortunately, however, without the benefit of a blind, they spotted us just as easily.  The adults kept greater distance, flying down the creek, trying to lead the juveniles to safer ground.  The juveniles were more curious, and spent their time flying overhead to get a better look at us.  Several of the adult Eagles also flew closer to get a better look, but were very stealthy, flying just above the treeline and sometimes doubling back to investigate us from behind.  The adults that flew overhead were very fast and thus very difficult to photograph quick enough, especially since it was unpredictable when or where they would come from.

12

12

Eagles weren't the only birds moving about.  A flock of Redheaded Woodpeckers were in the surrounding trees tapping away looking for snacks, which is somewhat interesting since they are more common in the midwest than the East Coast.  There were also a few Belted Kingfishers on overwatch, searching for fish to dive for in the creek.  Additionally, there were many other wildlife enjoying the area, including several different snakes and toads (lots of young toads hopping about), a heron, and a beaver that made several trips in and out of its dam.

13

13

Finally, the sun was going down, and it was a good 15 minutes even by ATV out of the woods.  The Park Ranger and I headed back to the trailhead, passing some of the historic farmgrounds along the way.  Finally, on my drive back to Virginia, the sun set, and the sky was painted a lovely pink and gold to end a very relaxing and fulfilling day.  And my repaired EF 70-200mm f/2.8L IS II USM and Extender 2X III seem to be fixed and playing nice together and independently again.  Next month I may venture out to Blackwater National Wildlife Refuge to learn what it's all about.

14

14

Thanks to the wonderful Park Ranger who made my visit to Calvert Cliffs State Park in Maryland very memorable and enjoyable.  I've never had such a unique and informative experience at any park before; it was definitely a welcome albiet unexpected way to spend the day, hunting Bald Eagles with a telephoto lens.

It's friendly Rangers this this, as well as caring and responsible visitors, who keep our wilderness clean, and Calvert Cliffs State Park is spotless.  This is perhaps in part due to the park's connection the the Chesapeake Bay and the efforts to rehabilitate the waterway, however the park is SO clean that it stands out - the only foreign objects at this park are the fossils, bones, and teeth that wash ashore, along with a large log of a non-indigenous tree which washed ashore with Hurricane Katrina.  I'm curious to go back to Calvert Cliffs to see what washed ashore with yesterday's Hurricane Sandy.

UPDATE:

I finally had my film developed.  None of the film had anything terribly important on them, so I opted to go with cheaper processing at Dwayne's Photo, rather than more expensive processing and scanning at another, higher end, photo lab I have in mind to try.  I only shot photos with my Holga while at Calvert Cliffs; one roll of Portra 400, and a roll of Provia 100F.  I like the color rendering of Portra 400 better.

I'm apparently had the film counter set to 16 instead of 12 when shooting these rolls, and I overlapped.  This is something I've never done before, but given that the one roll was in the camera for a good 9 months, I clearly haven't paid much attention to the Holga's settings.

BlogUpdate01

BlogUpdate01